Friday, October 24, 2014

Fixing Mistakes…

So, it's measure twice?

As I owned up to in my previous post, I made my previous fake bone cover just a bit too big.  I did measure twice, but I did also make a mistake.  I measured the piece I'm covering based on the previous version.  In the previous version, I didn't have pieces that "fenced" the fake bone piece in place.  While it is obvious that I should have accounted for them, I took a short cut and used the physical dimensions of the piece rather than putting the whole thing together and taking the measurements.  It was an obvious mistake.


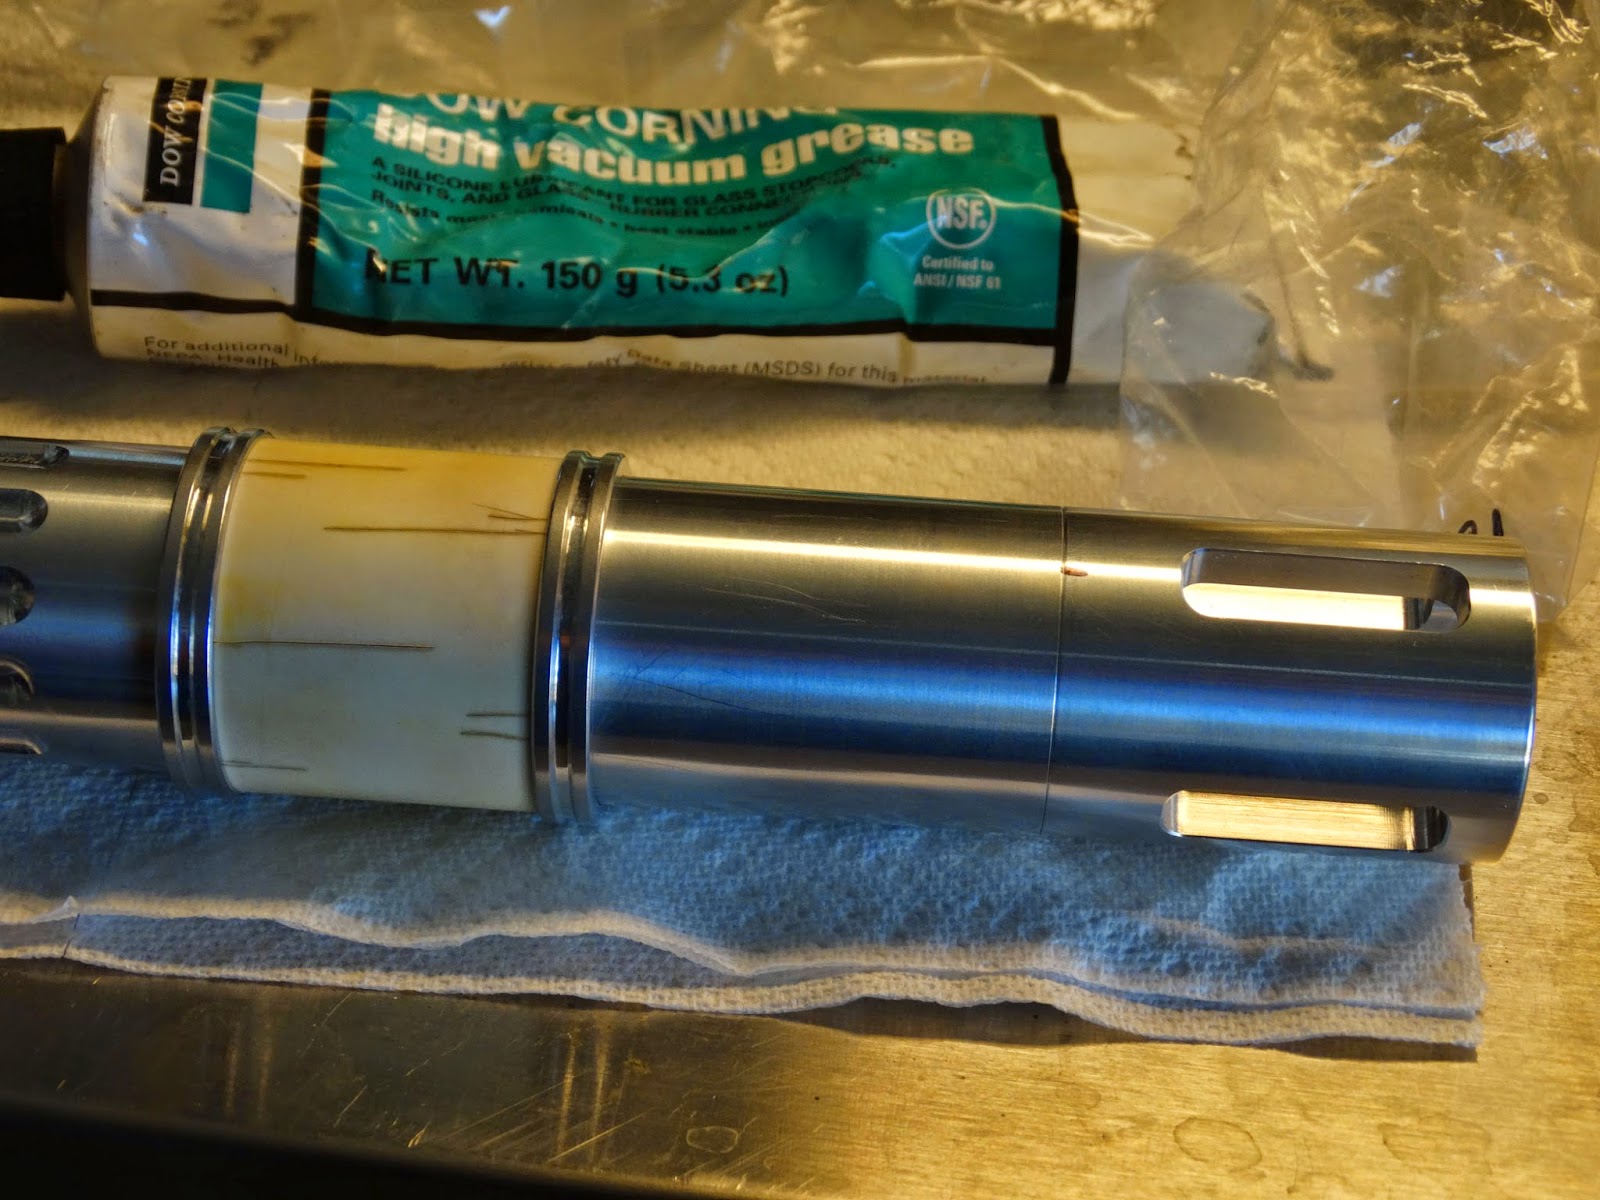
 The above is the new configuration.  The fences surround the crystal chamber - they'll keep the fake bone piece from sliding up and down the saber when finished.


Now, I measure again.  The space is 1.3495 inches.  While the crystal chamber part is 1.5 inches on the face, the "fences" remove some of the space.  It is interesting to know, that 1.3495 is still slightly too big.  If I made my replacement part using this measurement, the fake bone would jam against the "fences" and won't turn.  So, falling back on the rusty wheels of my experience machining parts, I take a guess that the fake bone piece should be cut to 1.3485 inches (or exactly 1/1000 of an inch shorter).  Using the same process as I did in my previous post (so as not to bore you repeating it), I made three new pieces.


They all fit.  Yay!  I took this picture to show how the part looks without making it look like bone.  The picture below shows a closer look at this particular part.


Taking only one of these parts, I go through the process of making the PVC fake bone look more like real bone.  Using an X-acto knife and three colors of paint (along with the liberal use of paint thinner), I have a fake bone on the saber.


As you can see, the fake bone part is in place.  This is actually the third and thinnest walled part because I am really looking forward to taking advantage of the translucence of the PVC when I can finally put the electronics into the saber.  I haven't cut the part to view the window in the aluminum underneath. 
As you can see, I placed a dot on what may be the "top" of the saber.  The dotted window actually  corresponds with a window on the crystal chamber.  Before I cut the window, I want to figure out the size so that I cut it right (I'd like to keep the other two parts on the bench in case I mess up again).

The Tube of Lube…

In the picture above, there is a tube of Dow Corning High Vacuum grease.  That's not there for show or scale; it's there because that's the grease I tend to use in my projects.  In this project, the parts are aluminum and are subject to "welding" when fitted together (although, it's more problematic with stainless steel, in my experience).  This grease is pretty interesting: it's a silicon (or silicone, I switch them sometimes) grease.  It is waterproof, so it won't wash away in water, nor is it subject to degrading due to high humidity.  Anyway, I liberally applied this to the threads of the saber parts before putting them together.  I'll probably apply a few more treatments as I work on the saber.

An insane idea.

In my last post, I expressed an interest in the translucent qualities of the PVC when turned thin for making these fake bone parts.  The idea I had won't seem insane at first blush: I want to try engraving lettering (in a Star Wars font) on the fake bone.  The lettering will look cool when the saber comes on.  Don't believe me, look at this part with a light shining into it to simulate a very bright crystal chamber.


Why is this an insane idea?  Well, engraving lettering on a part is a job for a CNC Machine.  That is, a computer controlled machine turns and carves the part, putting the lettering in as it turns and cuts.  Unfortunately, all I have access to in pure machining power is a lathe, a milling machine, and a few interesting gadgets for them (like a rotary table with dividing plates).  Without a CNC Machine, I can easily cut verticals and horizontals in letters, but diagonals are a very difficult or near impossible task.  I'd have to plunge drill along each letter to a specific depth.  It's messy and extremely time consuming, but possible.  It's simply so time consuming as to be impossible for any practical application.  The challenge is to create lettering in an elegant first pass without extra clean-up afterward.

However, a challenge is just that.  The key to making my idea work is to create a jig that allows me to cut a set of letters based on a stencil.  I've spent the last few weeks since the last post racking my brain on how to do this.  It's obvious to me that I have to have a stencil, a support to hold the part so that I can manipulate it with my hands while the mill spins an engraver, and a guide so that I only cut the marks of the letters and nothing else.  I'm hopeful that I can make this, but it will probably be the most complex jig I'll make in my lifetime.

Friday, October 3, 2014

Faking Bone

Making a Fake Bone Part For a Crystal Chamber Cover

A word on methods:

This is only one method for making a fake bone-like part.  Most people don't have access to a lathe.  It is a convenient tool, but is not a necessity for working up an excellent part.

Making the part:

Above is a picture of my first practice piece (3/4 inch PVC pipe) compared to the actual diameter pipe needed, which is 1 1/4 inches in diameter.  The bigger pipe has been cut much longer than I need for the actual part because it will be chucked up in a lathe for facing, boring out, and turning.  Facing is cutting the end square in regards to the table of the lathe.  Boring out is increasing the inner diameter (I.D.) of the pipe in this case - essentially, it's drilling a larger hole in a part.  Turning is the process of decreasing the outside diameter (O.D.) of the pipe in this case - essentially, this process makes the diameter of the piece smaller.

First, though, the PVC pipe has to be chucked up in the lathe.
Here, I've chucked up the piece in the lathe.  The trick is to try and center the piece so that I remove the least amount of material to do the job.  In most cases, I'd worry about the strength of the part.  Since this is a part that really doesn't get any load or stress, I can be fairly sloppy with it, but it's good practice to always do the best job possible.  That will keep me in practice for when it matters to center the piece precisely.
In the picture above, I've completed the job of facing the piece.  In the next set of pictures, I'm boring out the pipe so that it will fit an MHS part for the lightsaber I'm making.
The tool here is a boring bar.  I've spent many hours tending a lathe during a boring out procedure.  There's a reason it's called "boring," because it is.  I think I've told every joke I know about boring 2-3 times over.
After boring the pipe round on the inside, the MHS part won't even fit it's threads into the pipe.  I should note here that raw pipe (like you buy from Home Depot) is never perfectly round on the inside.  It's good practice to never trust that bought stock is round and check it before you work it.
Now, I've bored the pipe out so that the threads go in, but the part can't slip into the pipe.  At this point, I'm moving the tool to cut 1/1000 of an inch (.001 inches) which will remove a total of 2/1000 of an inch off the diameter.  As I get closer to the size of the part, I start cutting less by moving to half that amount (approximately 1/2000 of an inch).
Here's a picture of the boring process starting.  PVC cuts pretty good, though not as good as other plastics I've worked with in the past.

After a few passes, the MHS emitter fits in the pipe with just a little force.  I'm not working to a specific tolerance (or wiggle room), but the emitter barely wiggles as I slip it into the pipe.
Now that I finished boring the part out, I start turning the pipe down.  This performs two vital tasks for making a fake bone part.  First, it shaves off the shiny and painted outside of the PVC pipe (if you've seen PVC in stores, you know what it looks like).  Second, thinning the pipe (which is what turning will do in this case) will allow it to become more translucent.

Above, the two pictures show two different kinds of turning.  The top picture shows 3 bands that are somewhat raised from the rest of the surface.  That makes this a rough cut, removing a large amount of material without making the piece look nice.  The bottom picture is a finish cut, leaving the surface turned to a very uniform surface.  Because PVC is a plastic ceramic amalgam (I'd call it an alloy if it was metal, but I don't know the proper word when referring to plastics), the surface is matte.
Here, I've found the really nice feature of this new lathe (the last lathe I used burned up in an unfortunate house fire).  It has an auto-feed for the compound rest (where the tool is fixed to the lathe).  This is the very first time I've had an extremely clean cut-off of a piece I've worked on: it felt like magic.  As you can see, I caught the part with my finger as it was cut off.  DO NOT DO THIS.  Every material is sharp after being worked on the lathe (or, at the least, I assume it to be) and this is a very good way to lose a finger or something equally hideous.  I did this very carefully, but I'd never ever do something like this if I were working with metal parts.
Here, I've cut fissures in the PVC to simulate aged bone cracking as it dries.  I've seen this in scrimshaw (bone carvings), especially in carvings on teeth.
Using a combination of paints and PVC cleaner, I've yellowed the piece but dulled the fissures.  This is not the best combination, in my opinion.  My favorite routine is to cut the fissures, paint with black spray paint (wipe it off while still wet with paint thinner), apply a brown paint (again, wipe most away), and apply a yellow paint (wiping most away).  Between paint coats, I can remove dried paint with clear PVC cleaner solution, however doing so dulls previous layers of paint.  Below is the outcome with a final re-application of black paint.
Now, before I go on, I have to admit to a mistake.  When I measured the length of the fake bone part, I didn't have all the parts necessary to measure.  That is, I couldn't put the lightsaber together and see the complete picture.  I, therefore, took the measurement of the part I was covering (1.5 inches) and made my part exactly 1.55 inches in length.  When the final part came in, I found my mistake.  The crystal chamber piece is 1.5 inches in length but, with the Trim Rings I'm using to fence in the "bone" part, the length of the fake bone part should have been 1.35 inches in length.  Lesson re-learned - ALWAYS have all the parts together before making measurements.

Translucence of PVC

When I first noticed how translucent PVC became as I thinned it, I began to see how interesting this would make the crystal chamber cover.  Here's a picture:
The red light is a red LED in a small key chain pocket knife.  (The blue gloves are for me while I do other shop things.)  The PVC part is one I put threads in while experimenting on the lathe.

This translucence gave me an insane idea.  If I'm very good/lucky, I will post my next blog on the result of my insanity.  Until next time, MWHAHAHAHAHA!